Have a question or issue filing your publisher's statement? Contact AAM.
Getting Started

The left-hand menu has three sections:
- General Information and Circulation Data
- Analysis
- Review and Submit
Each section contains information about the data in each paragraph of y
our AAM publisher’s statement. Let’s take a look at the sections of the tool.
Publication Information
This section asks you to declare whether you are reporting print and digital circulation, as well as qualified paid, nonpaid (where applicable) and frequency. You can also update publisher and contact information, field served and the definition of qualified recipient. When completed, click the Save or Save and Continue button at the bottom of the page.
Note: Print & Digital Unduplicated will be entered in the PFC, but no longer reported separately. AAM will calculate and report your print reach, digital reach and unique totals. Refer to this article for further details.
Quick Tips:
- Your selections for circulation type and categories will determine the categories available throughout the filing tool. If you do not see the correct category displayed within the filing tool, double check your selections in the Publication Information section.
- When entering text, do not include apostrophes ('). These will be added by AAM during statement review.

Issue by Issue
The Issue-by-Issue section collects data for each reported distribution category and automatically populates six-month averages for each. The output for the Issue by Issue paragraph will be in the qualified paid and qualified nonpaid summary format only.
To complete the Issue by Issue section:
- Review the assigned calendar dates for each issue. This field will be prepopulated if the issue name contains a month or date. These dates are used for ordering the issues chronologically. If a publication does not have a date (i.e., winter issue), a calendar date needs to be assigned for that issue.
- To add or delete a row, click on the plus or red X icons.

- Indicate which issue is the analyzed issue by checking the Analyzed radio button next to the applicable issue. Enter data for each reported distribution category by issue. Note: Don’t forget to enter your nonqualified circulation.

- Reporting qualified paid distribution should be net, meaning returns have been deducted from paid distribution.
- If you are reporting a special issue, check the Special Issue box next to the appropriate issue. Special issue(s) will not be calculated in the six-month averages for qualified paid and qualified nonpaid sections. Note: Six-month averages appear at the bottom of the grid.

- The Show Totals button allows you to view totals by paid and nonpaid.

- Check the Not reporting adds/remove box if you are not reporting optional adds or removes.

- Instead of entering data directly into the filing tool, you may upload the issue-by-issue data section as a CSV file. To download an example file, click on the Download Excel Example. Click the CSV Specifications link for instructions on setting up your CSV file.
Quick Tips:
Please enter issue names according to the following:
- Monthly: First three letters of the month (e.g., May, Jun, Jul)
- Weekly: First three letters of the month followed by the two-digit date (e.g., Jun 01, Jun 08, Jun 15)
- Multi-month: Two three-letter abbreviations (e.g., Jun/Jul)
- Multi-week: Three-letter abbreviations followed by two-digit date/two-digit date (e.g., Jun 01/08)
- Other: Complete issue name (e.g., Football), Annual (e.g., 2016), Seasonal (e.g., Winter), Volume (e.g., Vol#24)
- Do not use periods with abbreviations
- Include a leading zero (e.g., Jun 08) in dates 1 to 9
- Uppercase the first letter
Issue by Issue Overall Example:

Regional and Demographic Editions
This section is only for reporting editions in which advertising was sold separately. Each edition will report the applicable paid and/or qualified nonpaid distribution. If you do not have separate editions, please skip to the next section of the filing tool.

Business Analysis
The Business Analysis (BA) takes the analyzed issue and details the paid and/or qualified nonpaid distribution by applicable business, industry, job titles, occupations or functions.
To file the BA, click on Business Analysis under the Analysis section. This section does not contain a data entry area but is submitted via Excel.
Notes:
- Business Analyses (BA) are submitted via Excel only. Emailed BAs will not be accepted.
- If reporting an international geographic analysis, please include it as a separate tab within your BA file.

Quick Tips:
- Indicate any changes to the previously filed BA with a note in your uploaded file. All format changes must be approved by AAM prior to the publisher’s statement release.
- Upload only one Excel file. If your publication also has a supplemental BA, please include it as a separate tab in the file.
- Include any images/graphics pertaining to the BA in the file.
- For any file edits that need to be made after statement submission, please contact AAM.
- If you would like to include a chart for your BA, contact AAM.
Steps for submitting your analysis: Use the customized AAM template
The AAM template has been populated based on your previously filed Business Analysis (BA). It is formatted and cannot be changed. Any changes to the BA format must be submitted and approved by AAM prior to the statement release. The format and graphics of your BA in the Excel file will be the same as it appears in your printed publisher’s statement. Your file will be stored in the publisher filing tool.
- Click on the Business Analysis link under the Analysis section.

- Download the linked template. Note: only one file should be used per publication. If you have supplemental sections within your BA and/or an international geographic analysis, these sections will appear as separate tabs within the file.

- Open the downloaded template, click on Enable Editing and save the file to your computer.

- Enter the business analysis data for the selected analyzed issue in the yellow highlighted areas, save the file to your computer, then upload the saved file.
Note: To activate the automatic check and balance feature, include the 'Total Analyzed Circulation' figure in the designated box in the upper left-hand corner of the spreadsheet.
To upload the completed Business Analysis (BA):
-
- Select the Choose File button
- Navigate to the saved file on your computer
- Click Open
- Select the Upload Business Analysis File button to upload the file

Quick Tip: If you wish to include graphics in the BA file, please contact AAM.
5. Business Analysis Final Step: Once you have uploaded your completed BA file you can view it in the Business & Occupational drop down on the View Data screen.
Note: Print & Digital Unduplicated will be entered in the PFC, but no longer reported separately. AAM will calculate and report your print reach, digital reach and unique totals. Refer to this article for further details.

Quick Tip: You can edit and reupload your file up until the moment you submit your filing. Once submitted, please contact AAM to make additional edits.
Source Analysis
This section examines the analyzed issue by the source of circulation and the age of that source for the qualified nonpaid distribution. Update this section with your current selected analyzed issue information.
There are three options for reporting your age of source (source analysis) data:
1. Standard Reporting: The default option reports the age of source by the standard 1-2-3-year age analysis along with both the main source categories and the detailed sub-source categories.

2. Report by Source Type Only: Click the blue "Report by Source Type Total" button to report the age of source by the 1-2-3-year age analysis and main source categories without detailed sub-source categories.

3. Total Only (print, digital, and print & digital unduplicated): Check the second box to report the source analysis in total only for the main source categories. This option does not include the 1-2-3-year age analysis or the detailed sub-source categories.

Notes:
- If you are reporting paid and nonpaid circulation in aggregate, check the "Click here if you are reporting paid and nonpaid circulation in aggregate" box.
- If reporting age of source by total only, the percentage of circulation from sources older than 24 months shall be explained in a footnote.
Mailing Address
This optional section reports how the copies in the analyzed issue were addressed. Check the Not Reporting box if you are not reporting this information. Then click Save and Continue.

Geographical Analysis
On the Geographic Analysis screen, enter the circulation for the designated analyzed issue by state and/or province. Check the box if you are reporting units. Remember to click Save often when entering your data. To view totals, click the Show Totals button.
U.S.

Canada

Note: If you are reporting international geographic data, create a separate tab for this information within your Business Analysis (BA) file.
There are two options for entering your publication’s geographic analysis: manually or via upload. The following instructions outline how to prepare and upload a customized geographic analysis spreadsheet to the Publisher Filing Center.
- Complete the Publication Information in the General Information section. The tool uses this information to customize your geographic template with the proper distribution categories for your publication.

2. Navigate to the Geographic section under Analysis. Click on Download Template and save the downloaded Excel template to your computer.

Note: For the geographic upload function to work in the filing application, only the pre-determined AAM Excel template may be used.
3. Enter your publication’s geographic information into the downloaded template and then save your completed file to your system.
Notes:
- The format of the Excel file cannot be changed. However, you may cut and paste data from your Excel reports into AAM’s customized Excel file.
- The customized AAM Excel template may be used for future publisher’s statement filings if your publication’s distribution categories don’t change.

4. Now that you’ve saved your Excel file, go back to the Geographic section in the filing tool and click the Choose File button. Select your file and click the Upload button to populate the geographic section of the filing tool. Remember to click Save or Save and Continue at the bottom of the screen to save your uploaded data.

5. Edits may be made either directly to the data in the geographic section or to the customized Excel template and then reuploaded to the tool.
Note: Do not add any symbols to the fields in AAM’s Excel template. The format is not editable, and the state/province/country order cannot be changed.
6. Once you are satisfied with the data in the geographic section, remember to click Save or Save and Continue.
Prices and Optional Data
This section allows you to report price data, term data and sales channels. Please use your previous publisher’s statement as a reference. If you are not reporting the optional paragraphs within this section, check Not reporting this optional paragraph. If you are reporting qualified nonpaid circulation only, then proceed to the next section.

Notes
The Notes section is where you may further explain any circulation claimed within the previous sections. Click on the Add Notes button to see a list of all possible disclosures and add those that apply to this statement period.
Note: When entering text, do not include any apostrophes ('). These will be added by AAM during statement review.

Publisher Comments
Add any comments or issues about your statement processing.

Upload Images
AAM encourages you to brand your document by adding your logo and cover images. Visit the Upload Files section to submit images. Logos, cover images and web page screenshots appear in different areas of the document. Below is a summary of where each image type appears and their optimum display settings.
Logo – Logos appear on the front page of your document. Logos need only be submitted once to AAM, unless your logo has changed. For optimum display of your logo, the image should be a high-resolution file of at least 300 dpi in TIFF or JPEG format.
Cover Images – Cover images appear on the front page of your document. A new cover image should be submitted each time you file with a cover date in the reporting period. For optimum display of your cover image, please submit a high-resolution file of at least 300 dpi in TIFF or JPEG format.
Web Page Images – Web page images appear on the front page of the Consolidated Media Report. Web page images represent your cross-media reporting channels (additional print product, website, e-newsletters, mobile, etc.). There is a limit of four web page images per document, one per media channel. New web page images should be submitted each time you file, with a date in the reporting period. For optimum display of your web page images, please submit a high-resolution file of at least 300 dpi in TIFF or JPEG format.
Other – This category is used for additional images that you wish to include in your report (i.e., sample questionnaires, maps). When using this option, please include a description of the file in the field next to the radio button (i.e., questionnaire).

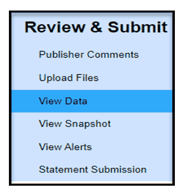
View Data
The View Data section summarizes all information entered into the filing tool and allows you to print or save a summary report.
Note: Print & Digital Unduplicated will be entered in the PFC, but no longer reported separately. AAM will calculate and report your print reach, digital reach and unique totals. Refer to this article for further details

View Snapshot
This area reflects your paragraph 1 data and Snapshot entry. If edits are necessary, please return to the General Information & Circulation Data section of the filing tool and make your corrections.

View Alerts
This section identifies any data errors. Please address all error messages before submitting your data.

Statement Submission
Once you have reviewed any alerts or errors and are ready to submit your data to AAM, enter your name, title and check the box to save your data. This serves as your certification of the data you are about to submit.
Then click the button to Submit Publisher's Statement Data to AAM. You will receive a confirmation email stating that the data has been submitted.

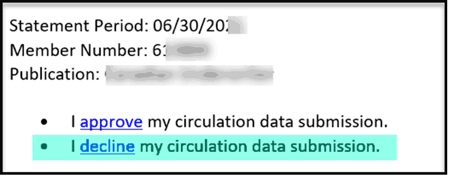
How to Approve or Reject Your Data Submission
Once you have submitted your data, you will receive an email from AAM stating that your data has been filed successfully. AAM will then review the data and send a follow-up email stating that your data has been approved or that it needs adjustments. If AAM approves the data, you will have an opportunity to review the data and either accept or decline your data submission.
Please note that AAM no longer sends a PDF proof of your publisher’s statement for review. Instead, you will need to follow the instructions below to appropriately review and approve or decline your recent data submission.
Note: If you file a Consolidated Media Report, you will receive two emails. First, an email will be sent for you to approve your publisher’s statement data through the filing tool as outlined below. Once your data has been approved for release, you will receive a second email containing a proof of the PDF Consolidated Media Report for your approval.
1. First you will receive an email from AAM that looks like this:

2. Click the link for the Publisher Filing Center and reenter your member number, username and password.
3. Select Publisher’s Statement Filing from the right-hand menu and choose the most recent filing period.
4. Once you’re in the tool, click on View Data under the Review & Submit section in the left-hand menu.
5. If you’re satisfied with your data, return to the email and select Approve. Now your data will be released to the Media Intelligence Center and the publisher’s statement will be produced and released.
6. If you’re not satisfied with your data, return to the email and select Decline. The filing tool will reopen for you to make any adjustments.
Questions on Filing - Contact Information
For questions or assistance, please contact AAM.